
How to Create Optoma Warranty Cards
Required Software:
- InDesign
- Microsoft Excel
- XBL Barcode Generator
Things to Note:
- The PN (Product Number) is Code-39
- The EAN is EAN-13
- THE SN (Serial Number) is Code-39
- It should take around 30 minutes to do 1000 cards
File Management:
When starting a new job, create a new folder in the Print folder with the following naming convention JOB NUMBER – Warranty Cards. Then simply copy and paste all the content from the template folder saved here Optoma\1. Design & Print\000000 – Warranty Template into your new folder – replacing the example TXT files where necessary.
Within the barcodes folder is a folder called Supplied, this is where everything supplied should be saved. Once the barcodes have been created along with the CSV these should be saved in the Barcodes folder.
Creating Barcodes:
The barcodes need to be generated using the following settings in XBL Barcode Generator:
You can import the following template which includes the SN setup, but this is also included below: SN-Barcode-template.txt
- Format: Code39
- Font: Arial
- Font Size: 12
- Width: 15cm
- Height: 4cm
- Alignment: Center
- Stretch: No
- Show Text Label: Yes
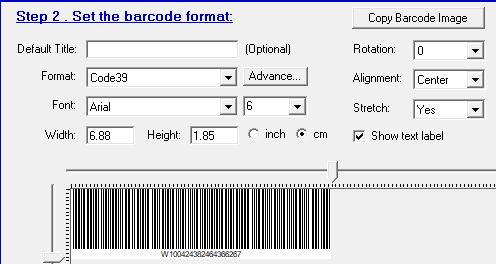
The PN and EAN Barcodes need to be generated in the following way:
- Format PN: Code-39
- Font: Arial
- Font Size: 12
- Width: 7.3cm
- Height: 4.5cm
- Alignment: Center
- Stretch: No
- Show Text Lable: Yes
- Format EAN: EAN-13
- Font: Arial
- Font Size: 12
- Width: 9cm
- Height: 5cm
- Alignment: Center
- Stretch: No
- Show Text Lable: Yes
Both of these are stored in 1. Assets in the root of the folder
- Open XBL Barcode Generator and set the settings as the required above
- Clear the barcodes from the list if required
- Copy and paste the SN from the supplied Optoma Spreadsherer into the Barcode Values text box, you will need to import all the serial numbers
- To export the Barcodes, click Export on the far left
- Select Format as EMF
- Click Select Folder
- Save the barcodes in the root of the ‘Barcodes’ folder
- The software quite often put this in a sub-folder, so you will need to move this to the root of the Barcodes folder
Creating PDFs through InDesign
Preparing CSV for data import:
Once you have recieved/created the individual barcodes and the combined csv, you will need to go open up the CSV in Excel and add the headers. Column one should contain the image names so the header will be ‘@filename.png (include the quotation mark at the beginning), column 2 should be the barcode numbers so the header will be barcode number, finally, column 3 should be the serial numbers so name this column serial number. Now exit and save the CSV into the same folder as the images.
Using InDesign to create the print ready PDFs:
- Open the Indesign File for the front in the root of the project folder
- Go to Window>Utilities>Data Merge
- Click the Icon comprising of 4 bars, this sits in the top right of the Data Merge box
- Click Select Data Source and then locate your new CSV file
- Leave the settings as default (Delimiter Comma, Encoding ASCII, Platform PC)
- If the headers were named correctly then the data tags should be correct but double check this. Drag and drop the tags in the data merga box to reset them.
- Depending on your InDesign layout, you may not see the image/barcode box. Click W to toggle views.
- Select the preview button in Data Merge and have a flick through to check for obvious errors.
- Once happy, click the 4 bars icon again in the top right of the data merge box and leave default settings.
- Now PDF export settings will open, simply change the preset to the print ready one and on General, click on the Create Separate PDF Files and use the following as the suffix ‘ – ^#‘ (this will add an incremental number to the end of each PDF exported
- Click on Export and locate the print ready folder and click on Save